
Start to Finish Veneers: Part 1, Treatment Planning
Many patients present to the dental office seeking cosmetic procedures to improve the appearance of their teeth and smile. Although teeth contribute to many biologic functions in humans, the importance of teeth as social devices should not be overlooked, as multiple studies relating dental esthetics to oral health related quality of life have correlated poor dental esthetics with psychosocial discomfort, and even poor dental hygiene in certain populations [i,ii]. With the advent of adhesive techniques and advanced dental materials, dentists have the opportunity to improve or enhance dental esthetics in a variety of patient populations using minimally invasive techniques and biomimetic principles. Through a three-part article, the requisite steps to provide responsible esthetic improvements will be covered in detail. This portion will focus on treatment planning and case design.


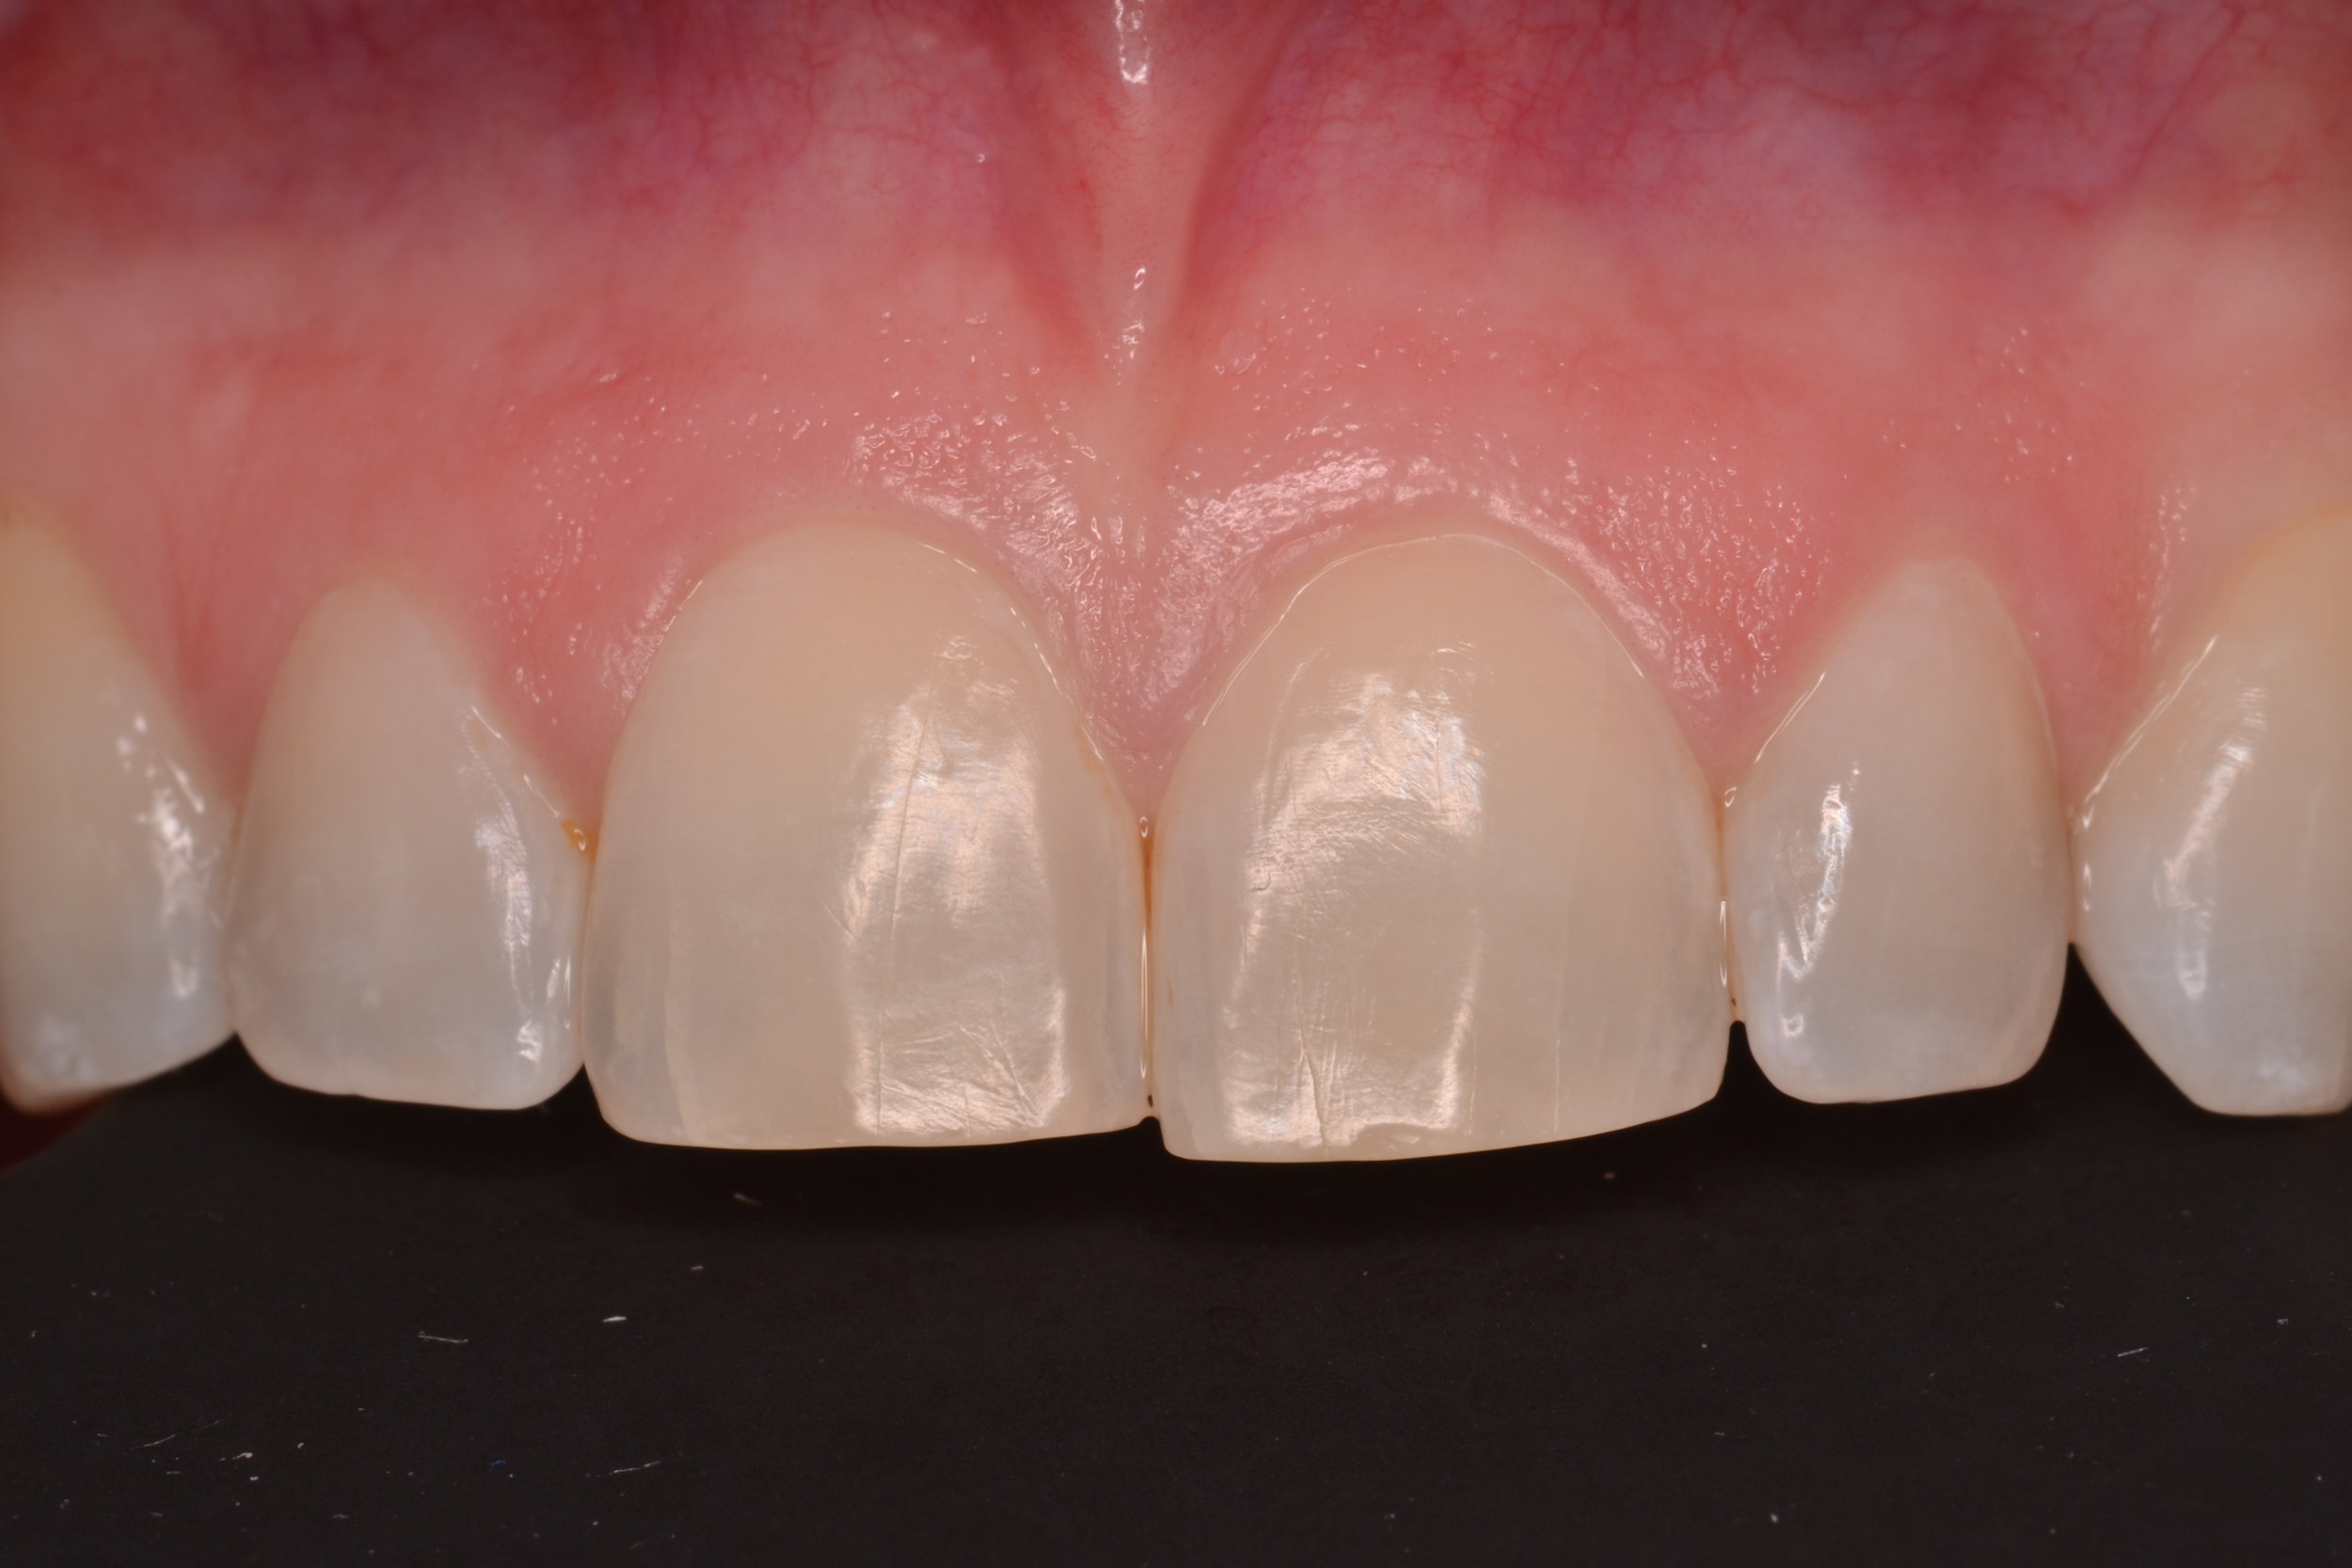
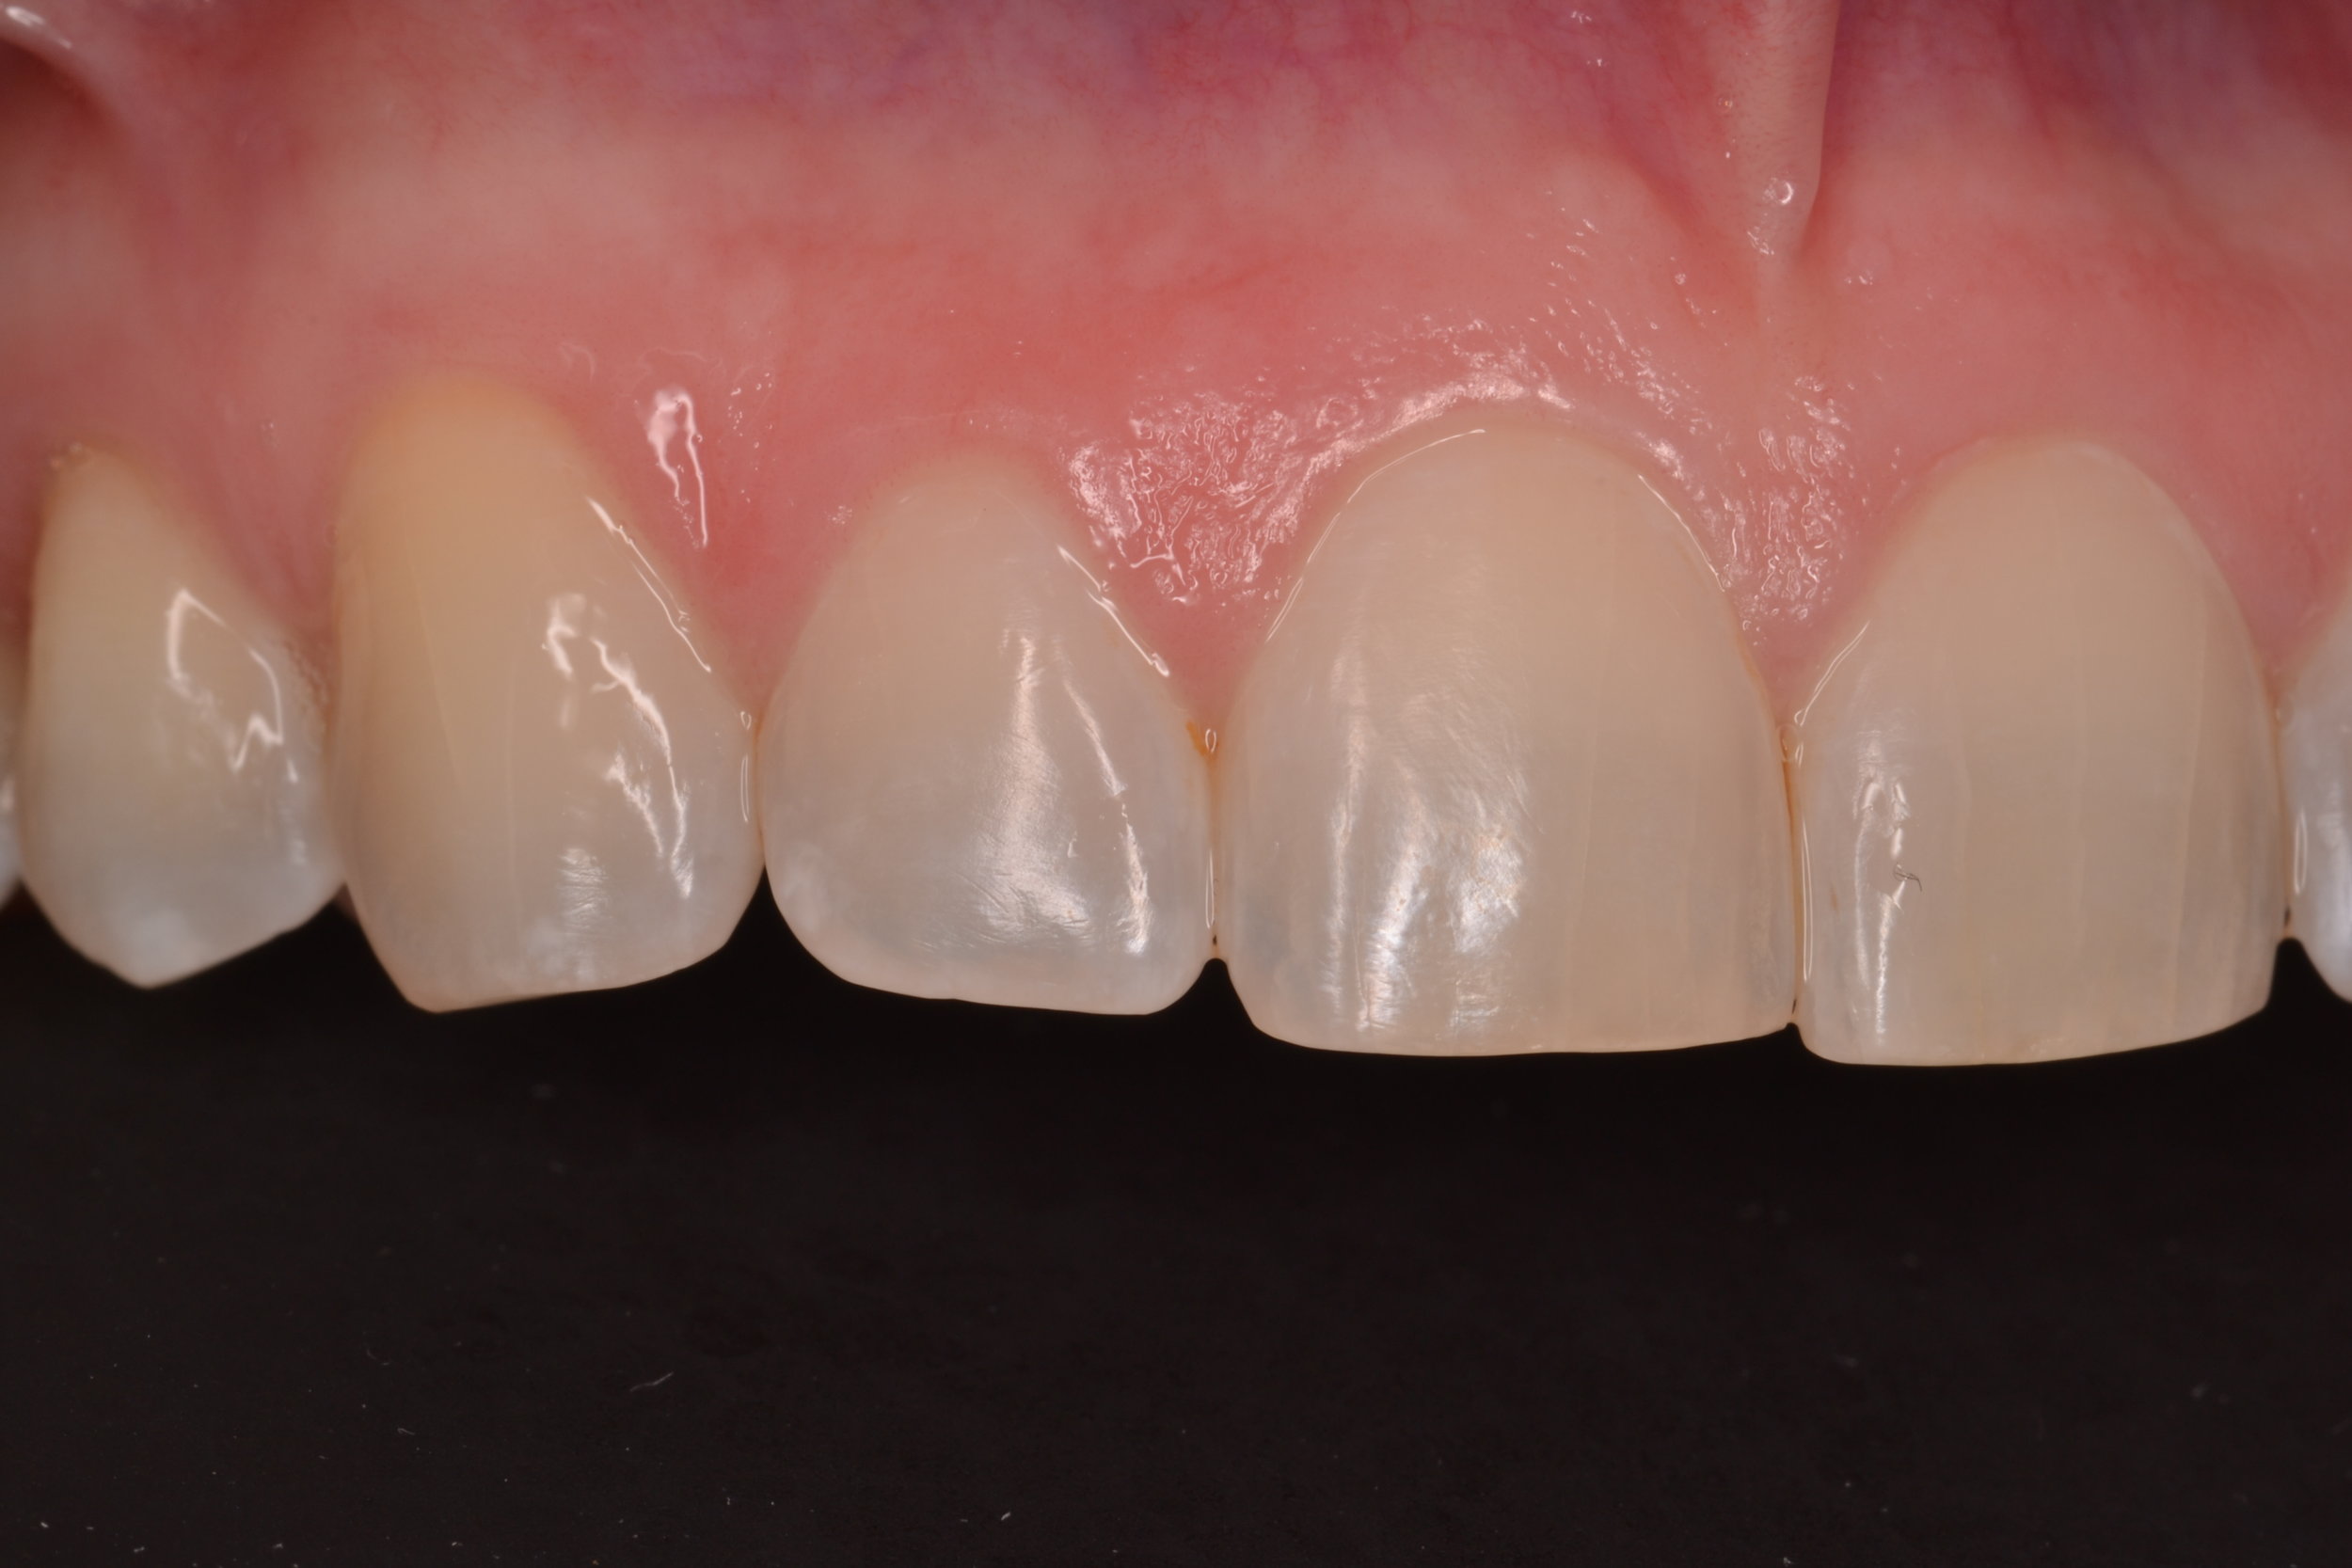


Figure 1; a) The 12 photographic views for AACD accreditation.


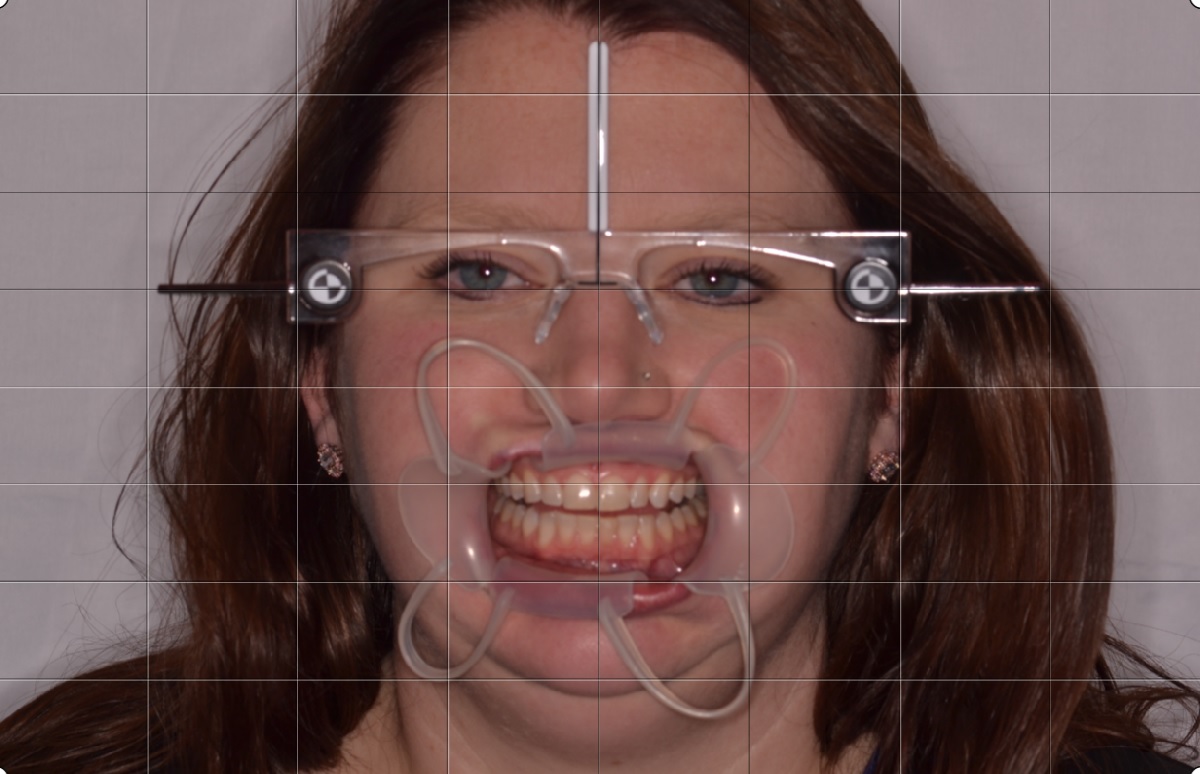
Figure 1b-d; b) Duchenne Smile (“E” smile) photo to evaluate lip mobility when muscle recruitment is high; c); Lip in repose photo to evaluate incisal edge position; d) Kois Facial Reference Glasses photo to evaluate maxillary plan and midline.


Figure 1; e) Shade tab photos for patient evaluation.
A 31-year old female presented to the dental office seeking improvements to her smile. The patient reported a history of orthodontic treatment, and expressed a desire to avoid orthodontic treatment if possible. Her chief complaint about the appearance of her teeth was the yellow color, despite repeated attempts to whiten with external bleaching. The patient also reported aversions to the incisal edge discrepancy, the overall length of her teeth, and the distally rotated upper left lateral incisor.
When planning large cases, the first step is to acquire and collate the necessary data. Photos were taken with a Digital Single Lens Reflex (DSLR) camera and macro lens before impressions were made. There are 16 photos the author considers essential. Twelve of the photos are the views required by the American Academy of Cosmetic Dentistry for accreditation [iii,iv] which consist of:
1. Natural Full Face – frontal angle – 1:10 (1:15) magnification
2. Full Natural Smile – frontal angle – 1:2 (1:3) magnification
3. Full Natural Smile – right lateral angle – 1:2 (1:3) magnification
4. Full Smile – left lateral view – 1:2 (1:3) magnification
5. Upper and lower teeth slightly parted – frontal view – 1:2 (1:3) magnification
6. Upper and lower teeth slightly parted – right lateral – 1:2 (1:3) magnification
7. Upper and lower teeth slightly parted – left lateral – 1:2 (1:3) magnification
8. Maxillary anterior in view only – frontal view – 1:1 (1:1.5) magnification
9. Maxillary anterior in view only – right lateral – 1:1 (1:1.5) magnification
10. Maxillary anterior in view only – left lateral – 1:1 (1:1.5) magnification
11. Maxillary arch – occlusal view – 1:2 (1:3) magnification
12. Mandibular arch – occlusal view – 1:2 (1:3) magnification
In addition, four adjunct photos are taken:
13. Duchenne Smile or Exaggerated (“E”) Smile photo (to evaluate lip mobility during a genuine smile)
14. Lip in repose (lip at rest) photo (to evaluate incisal edge position)
15. Kois Facial Reference Glasses with retraction (to identify any cants or midline discrepancies)
16. Shade tab photos (to assess patient preference for final shade)
(figure 1a-e)
The goal of the Duchenne Smile photo (“E” or Exaggerated Smile photo) is to activate the zygomatic major muscle and the orbicularis oculi muscle to provide perspective on tooth display that may only occur during a genuine smile (which is often difficult to replicate in the dental office). This photo is achieved by simply asking the patient to produce the biggest smile possible. Although there is variability in lip form, the lip in repose photo should focus on the canine, as Dr. Carl Misch concluded the canine exposure dimension relative to the upper lip in repose can be used to predictably assess anterior incisal edge position [v]. The patient is asked to say “Emma” and the photo is captured after the last syllable. The Kois Facial Reference Glasses are outfitted with horizontal and vertical reference planes and offer a chance to evaluate the current maxillary occlusal plane for cants that may need to be corrected, as well as the opportunity to correct midline cants or discrepancies. Shade tab photos are an excellent communication tool for the patient, laboratory, and dentist when determining the final shade in the definitive restorations. The shade tab should be aligned vertically and on the same plane as the teeth to be modified, and the shade tab label should be visible in the photo.
After photos are taken, high quality impressions are made (or full arch intra-oral scans are taken). The importance of taking impressions AFTER high quality photographs are taken should not be overlooked, as residual impression material can negatively affect otherwise excellent photographs. The impression technique used here utilizes a PVS heavy body putty and a PVS light body wash to capture as much detail as possible. Taking an inter-occlusal record can be challenging in some cases, and it is important to consider that certain patients may need to be treated to an orthopedically stable temporomandibular joint position, or Centric Relation Position, instead of an inter-cuspal position. If this is necessary, the most stable position of the joint should be determined and registered prior to restorative therapy. Fortunately, this patient had no signs of Temporomandibular Joint Dysfunction (despite evidence of occlusal interferences), and the inter-cuspal position was accepted as the treatment position.
Figure 2; Evaluating gingival heights and contours.
Currently, Computer Aided Design and Computer Aided Manufacturing (CAD/CAM) technologies are utilized in the majority of the author’s case planning, and have almost entirely replaced analog diagnostic wax-ups. For this case, definitive casts were made from the PVS impressions and mounted on a semi-adjustable articulator (Panadent). The casts and mounting were scanned into 3Shape CAD/CAM software. From here, the digital design process could commence. Although the main indication for veneers in this case was a patient desire for whiter teeth that were resistant to external bleaching, the goals of this case design were also based on smile design and dental esthetic principles [vi]. The digital “wax-up” begins with the maxillary central incisors, as it is essential that these teeth are symmetrical. To achieve this, it is necessary to first evaluate gingival health, zenith heights, and contours, as the gingival shroud will frame the teeth and subsequently the smile. For this patient, it was determined that the gingival levels and contours were balanced and in an acceptable position to maximize smile design principles (figure 2)[vii,viii]; no gingival plastic surgery would be required. Next, the design focused on individual tooth proportion and relative tooth dimension. The pre-operative dimensions of the central incisors were 9 mm in height and 9 mm in width (a 100% width to height ratio), giving them a square appearance that lacked femininity. Having accepted the location and shape of the gingival tissues, length was added to the incisal edges of the maxillary central incisors so the new height would be 10.5 mm, while the 9 mm width was maintained (producing a more normative width to length ratio of 86%)[ix]. After the central incisors were designed, relative tooth dimensions and appropriate axial inclinations were applied to the lateral incisor and canine designs. Specifically, the malposition of the maxillary left lateral incisor was corrected in the CAD/CAM design, making light of an important part of the planning process: the data acquired from the plan will help dictate the eventual preparation design. In this way, conservative and minimally invasive preparations to achieve the final outcome can be executed relative to the initial design. This is a special consideration when instant orthodontics are to be performed using direct or indirect restorative materials, as areas where more or less tooth removal is required can be identified by overlaying the initial model scan and the idealized CAD/CAM design (figure 3a-b). Finally, the upper bicuspids on each side of the arch were included in the design to create harmony throughout the smile composition and control the patient’s buccal corridor. After completion, the digital design can be stitched to a digital photo to offer a prospective image approximating the appearance of the proposed restorative design in the patient’s smile (figure 4).


Figure 3a-b; The digital wax up overlayed on the pre-operative scan showing the difference in pre-operative tooth position and the proposed changes from a) an occlusal view and b) a frontal view.

Figure 4; A prospective image approximating the appearance of the proposed restorative design digitally integrated into the patient’s smile
The design is then manipulated in the digital space to evaluate the case from different perspectives. This allows fine tuning of intricate details related to tooth form such as facial line angle position, embrasure symmetry and balance, and even surface variation and texture [x]. Next, functional considerations are addressed. The patient’s static and functional occlusion is evaluated and refined using the digital articulator. For this case, canine rise was an achievable goal. Additionally, it was discovered that the patient had multiple occlusal contact on inclined planes and functional interferences when excursive movements were performed in the digital work-space on the programmed digital articulator (figure 5). This finding was confirmed clinically and it was determined that equilibration would be planned and performed prior to tooth preparation and the equilibration would be refined after delivery of the definitive indirect restorations.


Figure 5; Static and functional occlusal markings for each arch, clinically and digitally.
After the case design is finalized, a model of the desired case outcome is printed using a 3D printer. This model is important in fabricating deliverable items that are essential to not only a good case outcome, but to a minimally invasive preparation design that will encourage biomimetic restoration of the teeth. First, a facial reduction guide is made. When the teeth included in the treatment plan are prepared for veneers, this index provides the operator a reference to areas where more or less reduction of tooth structure is necessary as it relates to the thickness of the restorative material. For this case, the goal will be to produce thin lithium disilicate (IPS eMax, IvoclarVivadent) veneers that will range in facial thickness from 0.5 mm to 0.7 mm [xi]. When compared to the pre-operative condition, the facial reduction guide aids the clinician in planning removal of tooth structure in a way that is conservative and consistent with the desired outcome. Additionally, an incisal reduction guide is made to offer a preparation reference that will replicate the final incisal edge positions of the restorations and ensure the ceramic technician has space to create incisal characteristics such as translucency and microanatomy. For this case, the desired thickness of restorative material at the incisal edge is 1.5 mm. Lastly, a fairly rigid silicone index of the model is made from the printed model of the mock-up [xii]. Not only will this index be used to provisionalize the case with a working prototype, but the index can offer a preliminary evaluation of the case outcome and offer an adjunct method for determining the necessary amount of facial reduction (figure 6a-f). To transfer the mock-up, the index is loaded with an auto-cure temporary composite acrylic material (Visalys Temp, Kettenbach Dental) and overlayed onto the existing teeth with no preparation or adhesive. The material is allowed to cure before the index is removed and gross excess material is trimmed. At this time, the prototype is evaluated by the clinical and the patient. Important photographs are taken evaluate the proposed design and to ensure the midline is perpendicular and aligned with the face. Tooth shape, length, proportion, and axial inclination is also evaluated. Shade can be roughly estimated at this time, as many provisional materials come in esthetic shades. After the prototype design is validated by the operator and patient, the preparation phase of treatment can begin (figure 7a-d).


Figures 6a-f; a) A facial reduction guide made to the proposed result; b)The facial reduction guide compared to the pre-operative model; c) An incisal reduction guide made to the proposed result; d) View of the proposed changes to the current incisal edges; e) A silicone matrix to transfer the mock-up (pre-operatively and for provisionalization); f) Wedges cut into the gingival embrasure spaces of the matrix to provide a spillway for excess provisional material.


d
Figure 7a-d; a) Full Smile – left lateral view – (1:3) magnification; b) Natural Full Face – frontal angle – 1:10 (1:15) magnification; c) Kois Facial Reference Glasses photo with mock-up in place; d) Upper and lower teeth slightly parted – frontal view – 1:2 (1:3) magnification
Integrating appropriate patient data and communicating appropriately with a capable dental laboratory are paramount to achieving ultimate success in cases dealing with functionally esthetic corrections and smile design. Careful thought must be given to the design process and dentist must avoid a “prep and pray” modality of rendering treatment. Involving the patient in the process is recommended, as patient input offered in the planning stages of treatment can not only increase overall satisfaction with the outcome, but can save expense and time in the restorative stages of treatment. Moreover, thorough planning with all parties involved (dentist, technician, patient) can be very rewarding and make planning cases like this extremely fun!

Dr. Ryan J. Yakowicz, DDS, FAGD
Dr. Yakowicz practices in the Greater Madison Area of South Central Wisconsin. Having completed over 775 hours of continuing education, his special interests include functionally cosmetic full mouth rehabilitation, TMD and oral-facial pain, and surgical implant placement and prosthetic restoration.
Dr. Yakowicz is currently the president of the Madison Dental Progress Forum Study Club and the Wisconsin Institute for Advanced Dental Education. He is a Fellow of the Academy of General Dentistry, and a member of the American Academy of Cosmetic Dentistry, and the American Academy of Fixed Prosthodontics. Additionally, Dr. Yakowicz participates in research studies for the National Provider-Based Research Network and is an Ambassador to the National Health Service Corps.
References:
[i] Silvola AS, Varimo M, Tolvanen M, Rusanen J, Lahti S, Pirttiniemi P. Dental esthetics and quality of life in adults with severe malocclusion before and after treatment. Angle Orthod. 2014 Jul;84(4):594-9.
[ii] Solomon D, Katz R, Bush A, Farley V, McGerr T, Min H, Carbonella A, Kayne J. Psychosocial impact of dental esthetics on periodontal health, dental caries, and oral hygiene practices of young adults. General Dentistry. 2016 March/April; 64 (2): 44-50.
[iii] American Academy of Cosmetic Dentistry. “A guide to accreditation photography: Photographic documentation and evaluation in cosmetic dentistry.” Madison, WI: 2009-2015.
[iv] Terry DA, Geller W. Esthetic & restorative dentistry: material selection & technique. Chicago: Quintessence Pub. Co., 2013: 553-572.
[v] Misch CE. Guidelines for maxillary incisal edge position-a pilot study: the key is the canine. J Prosthodont. 2008 Feb; 17(2): 130-134.
[vi] Magne P, Magne M, Besler, U. Natural and restorative oral esthetics. Part 1: Rationale and basic strategies for successful esthetic rehabilitations. Journal of Esthetic Dentistry 1993; 5: 161-173.
[vii] Rufenacht CR. Fundamentals of Esthetics. Berlin: Quintessence, 1990: 67 - 134.
[viii] Goodacre CJ. Gingival esthetics. Journal of Prosthetic Dentistry 1990; 64: 1-12.
[ix] Sterrett JD, Oliver T, Robinson F, Fortson W, Knaak B, Russell CM. Width / length ratios of normal clinical crowns of the maxillary anterior dentition in man. Journal of Clinical Periodontology 1999; 26:153-157.
[x] American Academy of Cosmetic Dentistry. “A guide to accreditation criteria: Contemporary concepts in smile design.” Maidson, WI: 2014.
[xi] “IPS eMax: Clinical guide.” Ivoclar Vivadent. (file:///C:/Users/ryany/Downloads/IPS+e-max+Clinical+Guide%20(1).pdf)
[xii] Magne P, Besler U. Bonded Porcelain Restorations in the Anterior Dentition: A Biomimetic Approach. Chicago, IL: Quintessence, 2003: 239-246.